Total 173 Questions
Last Updated On : 27-Jul-2026
Preparing with OmniStudio-Developer practice test 2026 is essential to ensure success on the exam. It allows you to familiarize yourself with the OmniStudio-Developer exam questions format and identify your strengths and weaknesses. By practicing thoroughly, you can maximize your chances of passing the Salesforce certification 2026 exam on your first attempt. Start with free Salesforce Certified OmniStudio Developer - Plat-Dev-210 sample questions or use the timed simulator for full exam practice. Surveys from different platforms and user-reported pass rates suggest Salesforce Certified OmniStudio Developer - Plat-Dev-210 practice exam users are ~30-40% more likely to pass.

A healthcare company wants to enable its subscribers to add, edit, or delete dependents
related to their policy via their Community portal. The developer on the project decides to
use an OmniScript.
How should the developer configure the OmniScript to provide this functionality?
A. Use an Edit Block element configured with Remote Actions.
B. Use a Text Block element and a Remote Action element.
C. Use an Input Block element and a Data Mapper Post Action element.
D. Use an Edit Block element configured with SOQL statements.
Explanation:
For allowing Community users to add, edit, and delete dependents linked to a policy, the best OmniScript component is:
✔ Edit Block
Built specifically for managing repeating records (create, update, delete).
Ideal for scenarios like dependents, addresses, contacts, etc.
Automatically supports Add, Edit, Remove functions for each row.
✔ Remote Actions
Remote Actions allow the OmniScript to:
Retrieve dependent records
Update or create new dependents
Delete dependents via Apex or Integration Procedures, making it secure for Community users.
Why the other options are incorrect:
B. Text Block + Remote Action
❌ Text Blocks cannot handle editable list data.
C. Input Block + Data Mapper Post
❌ Input Blocks collect input but cannot support add/edit/delete rows dynamically.
D. Edit Block + SOQL
❌ Direct SOQL in OmniScript is not a best practice and not supported. Data retrieval must use DataRaptors, Integration Procedures, or Remote Actions.
A developer creates an OmniScript to update billing information. After analyzing the
different types of customer interactions that occur at the company, the developer
determines updating billing information should be included in the majority of customer
interactions.
What should the developer use to configure the action that invokes the OmniScript?
A. OmniScript Action
B. Custom Action
C. Lightning Action
Explanation
If an OmniScript (OS) needs to be reused across many customer interactions—especially as a common step like updating billing information—the correct way to invoke it is using an OmniScript Action.
Why OmniScript Action?
An OmniScript Action allows you to:
- Launch one OmniScript from another
- Reuse a common OmniScript as a sub-flow
- Maintain consistency across multiple customer journeys
- Avoid duplicating logic
This is the intended approach when a process (like billing updates) is reusable and shared across many user flows.
❌ Why the others are incorrect
B. Custom Action
Custom Actions are used mainly in FlexCards, not OmniScripts.
They are for FlexCard buttons, not for embedding or reusing an OmniScript.
C. Lightning Action
Lightning Actions are for Salesforce Lightning pages, not for assembling OmniScripts together. They don’t enable reuse inside OmniScripts.
Refer to the exhibit below. A developer has configured an Integration Procedure element with SEND/RESPONSE TRANSFORMATIONS as shown.
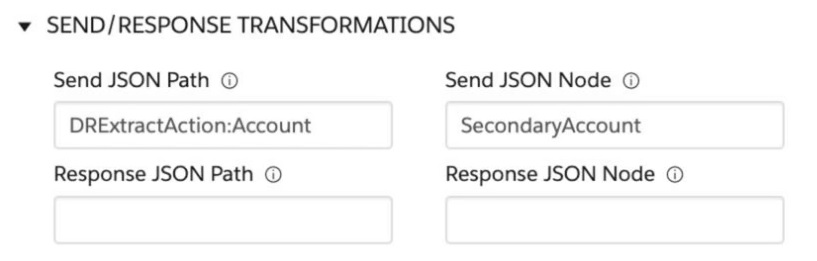
Alternatively, how could the developer configure Additional Input to send exactly the same data? Assume that the developer checked Send Only Additional Input.
A. Key Value - SecondaryAccount DRExtractAction:Account
B. Key Value - SecondaryAccount %DRExtractAction:Account%
C. Key Value - DRExtractAction:Account SecondaryAccount
D. Key Value - %DRExtractAction:Account% SecondaryAccount
Explanation:
Let’s figure this out step by step! In the exhibit, the Integration Procedure element is set up with SEND/RESPONSE TRANSFORMATIONS. The "Send JSON Path" is set to DRExtractAction:Account, and the "Send JSON Node" is set to SecondaryAccount. This means the data from DRExtractAction:Account will be sent and labeled as SecondaryAccount. Now, the question asks how to configure the "Additional Input" to send the same data, with the "Send Only Additional Input" option checked.
When you use "Additional Input" with "Send Only Additional Input," you need to pass the data using a key-value pair. The key will be the name you want (like SecondaryAccount), and the value will be the data source (like DRExtractAction:Account). So, the correct way is to set the key as SecondaryAccount and the value as DRExtractAction:Account. That matches option A!
Option B uses %DRExtractAction:Account%, which is a merge field syntax. This is used for dynamic values in OmniScripts, not for direct data mapping in this case, so it’s not right.
Option C switches the key and value, making DRExtractAction:Account the key and SecondaryAccount the value, which is the opposite of what we need.
Option D also uses %DRExtractAction:Account% and swaps the order, so it’s incorrect too.
Think of it like giving a nickname to some data. You name it SecondaryAccount (the key) and point it to the data in DRExtractAction:Account (the value). Option A does this perfectly!
Reference: Salesforce OmniStudio Developer Guide
A developer is configuring an integration Procedure Action in an OmniScript. The Omniscript needs a JSON response from the Integration Procedure but does not need to wait for the response for the user to proceed. Which feature should the developer enable?
A. Use Future
B. Invoke Mode Non-Blocking
C. Invoke Mode Fire and Forget
D. Toast Completion
Explanation:
This question tests your knowledge of the different Invoke Modes for an Integration Procedure Action within an OmniScript and their impact on the user experience and data flow.
The key requirements are:
- The OmniScript needs to call the Integration Procedure.
- The OmniScript does not need to wait for the response for the user to proceed.
This describes an asynchronous operation where the backend process is decoupled from the user's navigation through the script.
Let's analyze each option:
A. Use Future: This is incorrect. "Use Future" is a property within an Integration Procedure step (like a DataRaptor Transform or HTTP Action) that makes that specific step asynchronous on the server. It does not control the behavior of how the OmniScript interacts with the IP. The OmniScript would still wait for the entire IP to report back its final status.
B. Invoke Mode Non-Blocking: This is incorrect. "Non-Blocking" is a legacy term. In modern OmniStudio, the equivalent and precise setting is "Fire and Forget." Using the specific terminology from the product is crucial for the exam.
C. Invoke Mode Fire and Forget: This is the correct answer. When you set the Invoke Mode of an Integration Procedure Action to "Fire and Forget", the OmniScript sends the request to the IP and immediately continues to the next step without waiting for a response. The user can proceed with the OmniScript uninterrupted. The IP executes in the background. This perfectly matches the requirement that the user does not need to wait.
D. Toast Completion: This is incorrect. "Toast Completion" is a feature that, when enabled, displays a temporary notification message (a "toast") to the user upon the successful completion of the action. It is a UI feedback mechanism, not a control for the execution flow. The script would still wait for the IP to finish before showing the toast and proceeding, which violates the "does not need to wait" requirement.
Summary
The Invoke Mode on an Integration Procedure Action controls the OmniScript's waiting behavior:
- Blocking (Default): The OmniScript pauses and waits for the IP to fully complete and return a response before moving forward.
- Fire and Forget: The OmniScript triggers the IP and moves on immediately. It does not receive any response data from the IP, and any errors in the IP are not reported back to the OmniScript.
Therefore, to allow the user to proceed without waiting for the JSON response, the developer must enable Invoke Mode: Fire and Forget.
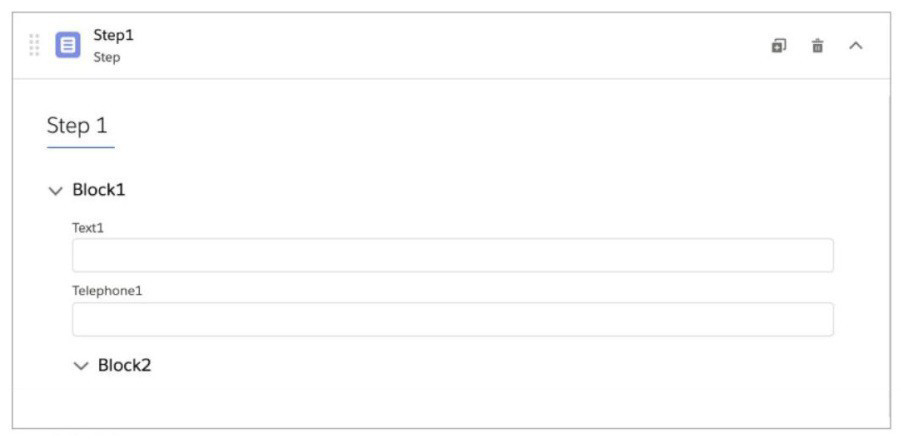
Refer to the exhibit below. What JSON code correctly represents the step in the OmniScript Structure panel shown?
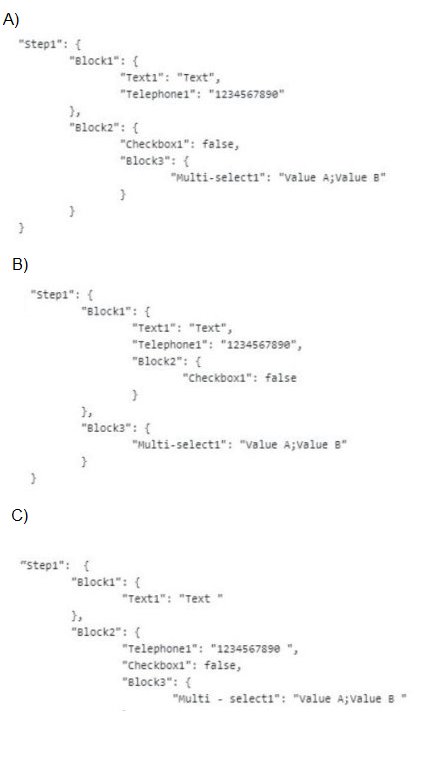
A. Option A
B. Option B
C. Option C
D. Option D
Summary:
This question assesses the ability to match a JSON structure to an OmniScript configuration displayed in the Structure panel. The panel shows a step with two blocks: Block1 (Text1 and Telephone1 fields) and Block2 (Checkbox1 and Multi-select fields). The correct JSON must accurately reflect this hierarchy and field names without extra or missing elements.
Correct Option:
C. Option C
Option C correctly represents the step with "Block1" containing "Text1" and "Telephone1" fields, and "Block2" containing "Checkbox1" and "Multi-select" fields. The JSON structure aligns with the UI, using proper nesting and including all specified fields with appropriate values, matching the OmniScript design.
Incorrect Option:
A. Option A
Option A includes an erroneous "Block3" with "Multi-select" and "Checkbox1" misplaced, which does not match the UI's two-block structure. This extra block and incorrect field placement make it an invalid representation.
B. Option B
Option B separates "Checkbox1" and "Multi-select" into different blocks ("Block2" and "Block3"), which does not align with the UI showing both under Block2. This misplacement disrupts the intended structure.
D. Option D
Option D lacks proper nesting under "Block2" for "Checkbox1" and includes a space in "Multi - select", which does not match the field name in the UI. This inconsistency renders it incorrect.
Reference:
Salesforce Help: OmniScript Designer
A developer builds a new OmniScript. It contains aSet Values element with a ContextId key/value pair that was used during testing.
What should the developer do before moving the OmniScript to a production org?
A. Update the ContextId value to specify an id from the Production org.
B. Add a Show/Hide condition on the Set Values element.
C. Delete or Deactivate the Set Values element.
D. Deactivate the contextId key/value pair
Summary
A Set Values element with a hardcoded ContextId is a common technique used for testing an OmniScript in a development or sandbox environment, as it allows the developer to simulate working with a specific record. However, hardcoded IDs are org-specific and will be invalid in a production org. Leaving such testing artifacts in a production-bound component is poor practice and will cause runtime errors.
Correct Option
C. Delete or Deactivate the Set Values element.
This is the correct and safest course of action. The Set Values element with the hardcoded ContextId was a testing scaffold, not part of the actual business logic. Before promoting to production, this testing element should be removed entirely (deleted) or, if it contains other necessary values, deactivated so it does not execute. The production OmniScript should receive its context (like a Record Id) dynamically from the launching point (e.g., a FlexCard, Lightning record page, or Community), not from a hardcoded value.
Incorrect Option
A. Update the ContextId value to specify an id from the Production org.
This is an anti-pattern and should never be done. Hardcoding any record ID in a component makes it non-portable and brittle. The ID will likely not exist in all target orgs, and even if it does, the script will only work for that single record, which is not the intended behavior.
B. Add a Show/Hide condition on the Set Values element.
Adding a condition does not solve the core problem. The element would still be present in the configuration. If the condition were to somehow evaluate to false in production, the ContextId would never be set, breaking the script's logic that depends on it. The correct approach is to remove the testing artifact, not to hide it.
D. Deactivate the contextId key/value pair
Most Set Values elements do not have an activation checkbox for individual key/value pairs. Even if this were possible, it would leave behind unnecessary configuration clutter. The entire purpose of the element was for testing, so the cleanest and most correct practice is to remove the element itself.
Reference
Salesforce OmniStudio Developer Guide: OmniScript Best Practices
A developer needs to configure a calculation procedure to calculation a subtotal using two different depending on whether the input Boolean variable isCustomer is set to true or false. How should a developer configure the calculation procedure to conditionally execute the correct formula?
A. Use two separate Calculation Steps with the Conditional Step property selected: use the ISTRUE (is Customer) and NOT (ISTRUE) (is Customer) functions in the Condition syntax.
B. Use two separate Calculation Steps with the Conditional Step property selected: reference just the is Customer variable in the Conditional syntax (no comparison necessary)
C. Use two separate Calculation Steps with the Conditional Step property selected: compare the is Customer variable directly to the literal true and false values in the Condition syntax.
D. Use a single Calculation Steps with IF statement directly in the formula definition to reference the is Customer variable and conditionally perform the appropriate calculation.
Summary
The requirement is to execute one of two different calculations based on the value of a Boolean variable (isCustomer). In a Calculation Procedure, this conditional logic is implemented using the "Conditional Step" property on individual Calculation Steps. This allows the procedure to evaluate a condition for each step and only execute that step if the condition is true, providing a clear, structured way to handle branching logic.
Correct Option
A. Use two separate Calculation Steps with the Conditional Step property selected: use the ISTRUE (isCustomer) and NOT (ISTRUE(isCustomer)) functions in the Condition syntax.
This is the correct and most explicit method. It involves creating two distinct Calculation Steps.
The first step has its Conditional Step property enabled with the condition ISTRUE(isCustomer). This step's formula will only execute if isCustomer is true.
The second step also has Conditional Step enabled with the condition NOT(ISTRUE(isCustomer)). This step's formula will only execute if isCustomer is false.
This ensures that only one of the two calculations runs, providing clean and reliable conditional logic.
Incorrect Option
B. Use two separate Calculation Steps with the Conditional Step property selected: reference just the isCustomer variable in the Conditional syntax (no comparison necessary)
This is incorrect. The condition field must evaluate to a Boolean value. Simply referencing isCustomer without a function or operator is syntactically invalid in the condition syntax. The condition must be a full expression, such as ISTRUE(isCustomer).
C. Use two separate Calculation Steps with the Conditional Step property selected: compare the isCustomer variable directly to the literal true and false values in the Condition syntax.
This approach is flawed. You cannot compare a variable directly to the literals true or false in the Calculation Procedure's condition syntax. The correct way to check a Boolean variable is to use the ISTRUE() or ISFALSE() functions. A direct comparison like isCustomer == true would not be recognized.
D. Use a single Calculation Step with an IF statement directly in the formula definition to reference the isCustomer variable and conditionally perform the appropriate calculation.
While a single complex formula with an IF statement might work in some contexts, it violates the principle of using the dedicated "Conditional Step" feature for this purpose in Calculation Procedures. Using Conditional Steps is the more declarative, manageable, and best-practice approach for this scenario, as it keeps the individual formulas simpler and the logic flow more visible.
Reference
Salesforce OmniStudio Developer Guide: Calculation Step Properties
In a calculation procedure, what is required for the output of a calculation step to be used in an aggregation step?
A. It must be included in constants.
B. It must bea matrixlookup step.
C. It must be a calculation step.
D. It must be included in the calculation output.
Explanation:
A Calculation Procedure is used to perform complex multi-step calculations. Its structure involves:
Calculation Steps: These steps perform the individual operations (e.g., formulas, matrix lookups).
Aggregation Step: This final step gathers results from the calculation steps to produce the overall procedure output.
For the result of a calculation step to be available for use in the Aggregation Step, it must be explicitly defined in the Calculation Output of that step.
Here’s the logical flow:
Each calculation step has its own Input and Output configuration.
The fields listed in a step's "Calculation Output" are the results that step produces.
The Aggregation Step can only reference and combine outputs that have been declared in the Calculation Output of previous steps.
If a value is computed but not included in the Calculation Output of its step, it is considered an intermediate variable and is not passed forward to the Aggregation Step.
Why the other options are incorrect:
A. It must be included in constants:
Constants are fixed values defined in the procedure's setup. They are input into calculation steps, not the output from them.
B. It must be a matrix lookup step:
The type of step (e.g., Formula, Matrix Lookup) does not matter. Any step—whether it's a Formula, Matrix Lookup, or another type—must have its result included in its Calculation Output to be used later.
C. It must be a calculation step:
This is tautological (true by definition). The output in question is already from a calculation step. However, this statement misses the specific requirement that the output must be explicitly declared to be passed on.
Reference:
Salesforce OmniStudio Documentation:
The "Calculation Procedures" section explains the data flow. It explicitly states that the Aggregation Step "aggregates the output from multiple calculation steps," meaning it can only use what those steps have emitted in their output.
A developer needs to build a multi-step intake form. Each step must allow the user to cancel the intake at any time. The developer is using an LWC OmniScript to build the form.
How should the developer implement thecancel functionality for all steps using the LWC OmniScript Designer?
A. Check the Enable Cancel checkbox in the Setup tab under Cancel Options.
B. Add a navigation Action inside each step and set the Component name to ‘’Cancel’’,
C. Add a navigation Action outside each step and set the Element Name to ‘’Cancel’’,
D. Add a navigation Action inside each step and set the Element Name to ‘’Cancel’’,
Summary
Implementing a global cancel functionality that is available across all steps of an OmniScript requires a configuration at the script level, not by adding individual elements to each step. The LWC OmniScript provides a built-in mechanism for this in its setup configuration. This approach ensures consistency, reduces repetitive configuration, and leverages the framework's native navigation controls.
Correct Option
A. Check the Enable Cancel checkbox in the Setup tab under Cancel Options.
This is the correct and most efficient method. In the OmniScript's Setup tab, there is a section for Cancel Options. Checking the "Enable Cancel" checkbox activates a global cancel button in the OmniScript's header. This button is available on every step without any need for the developer to manually add navigation elements, ensuring consistent cancel functionality throughout the entire multi-step form.
Incorrect Option
B. Add a navigation Action inside each step and set the Component name to ‘’Cancel’’
This is inefficient and error-prone. It would require manually adding the same element to every single step. Furthermore, the "Component Name" property is not used to define a cancel action; it is related to the underlying Lightning Web Component type.
C. Add a navigation Action outside each step and set the Element Name to ‘’Cancel’’
Navigation elements cannot be placed outside of a step. All actionable elements must reside within a Step element in the OmniScript structure. This configuration is not possible.
D. Add a navigation Action inside each step and set the Element Name to ‘’Cancel’’
While this would technically work by placing a button in every step, it is a manual, repetitive process that violates the DRY (Don't Repeat Yourself) principle. It is not the best practice when a simple, global configuration option ("Enable Cancel") exists to achieve the same result more reliably and with less effort.
Reference
Salesforce OmniStudio Developer Guide: OmniScript Setup Properties
What should a developer's first step be when troubleshooting whether a DataRaptor Extract is retrieving data?
A. Go to the Lightning Console and reload the page to test.
B. Go to the PREVIEW tab In OmniScript to test.
C. Deactivate the card andlayout, andgo to the PREVIEW tab for the card to test.
D. Add a key/value pair in the DataRaptor to test it.
Summary
When troubleshooting a DataRaptor Extract, the most efficient first step is to use the integrated Preview tab within the DataRaptor interface itself. This tool allows you to execute the DataRaptor in isolation by providing a sample JSON input. It immediately shows the output or any errors, confirming whether the issue lies within the DataRaptor's configuration (like the JSON extract map) or elsewhere in the integration.
Correct Option
B. Go to the PREVIEW tab In OmniScript to test.
This is the correct first step because the Preview tab is a dedicated, controlled environment for testing DataRaptors. You can provide a specific input JSON that mimics what your OmniScript would send, and the tab will display the exact output the DataRaptor returns.
This isolates the DataRaptor's functionality. If it fails here, the problem is definitively within the DataRaptor's configuration (e.g., an incorrect field mapping or object relationship). If it works here, the issue likely lies in how it's being called from the OmniScript or Integration Procedure.
Incorrect Option
A. Go to the Lightning Console and reload the page to test.
This is an inefficient first step. Reloading an entire application page involves many other components (the OmniScript, layouts, other data sources). It does not isolate the DataRaptor, making it difficult to pinpoint the root cause of the data retrieval issue.
C. Deactivate the card and layout, and go to the PREVIEW tab for the card to test.
This approach is overly complex and indirect for the stated goal. The Card's Preview tab tests the entire card, not just the DataRaptor. Deactivating components is unnecessary when a direct testing tool for the specific component in question is available.
D. Add a key/value pair in the DataRaptor to test it.
Modifying the DataRaptor by adding new elements should not be the first troubleshooting step. The correct initial action is to diagnose the current configuration using the Preview tool. Making changes before understanding the problem can introduce new errors and is not a systematic debugging approach.
Reference
Salesforce OmniStudio Developer Guide: Test a DataRaptor
| Page 1 out of 18 Pages |
| 123456 |
Our new timed 2026 OmniStudio-Developer practice test mirrors the exact format, number of questions, and time limit of the official exam.
The #1 challenge isn't just knowing the material; it's managing the clock. Our new simulation builds your speed and stamina.
You've studied the concepts. You've learned the material. But are you truly prepared for the pressure of the real Salesforce Certified OmniStudio Developer - Plat-Dev-210 exam?
We've launched a brand-new, timed OmniStudio-Developer practice exam that perfectly mirrors the official exam:
✅ Same Number of Questions
✅ Same Time Limit
✅ Same Exam Feel
✅ Unique Exam Every Time
This isn't just another OmniStudio-Developer practice questions bank. It's your ultimate preparation engine.
Enroll now and gain the unbeatable advantage of:
Copyright © - All Rights Reserved