Total 212 Questions
Last Updated On : 5-May-2026
Preparing with Salesforce-CPQ-Administrator practice test 2026 is essential to ensure success on the exam. It allows you to familiarize yourself with the Salesforce-CPQ-Administrator exam questions format and identify your strengths and weaknesses. By practicing thoroughly, you can maximize your chances of passing the Salesforce certification 2026 exam on your first attempt. Start with free Salesforce Certified CPQ Administrator sample questions or use the timed simulator for full exam practice. Surveys from different platforms and user-reported pass rates suggest Salesforce Certified CPQ Administrator practice exam users are ~30-40% more likely to pass.

Universal Containers wants to change its $500 maintenance product to be based on a percentage of subscription products in the Storage product family.
The maintenance product has been updated to be priced as Percent Of Total and the
percentage has been set.
How should the product records be altered to meet this requirement?
A. Set the maintenance product Percent Of Total Category to Storage. On all Storage subscription products, set the Percent Of Total Category to Storage and set Include in Percent of Total to True.
B. Set the maintenance product Include in Percent of Total to True. On all Storage subscription products, set the Percent Of Total Category to Storage and set Include in Percent of Total to True.
C. Set the maintenance product Percent Of Total Category to Storage and set Include in Percent of Total to True. On all Storage subscription products, set the Percent Of Total Category to Storage.
D. Set the maintenance product Percent Of Total Category to Storage. On all Storage subscription products, set the Percent Of Total Category to Storage and set Exclude From Percent of Total to False.
Explanation:
This question tests the understanding of how to configure Percent of Total (POT) pricing for a specific subset of products using a category. The setup requires two parts: configuring the POT product (the maintenance product) and configuring the "covered" products (the storage products).
Maintenance Product Setup
Percent Of Total Category: The maintenance product must be configured to reference the correct category to identify which products it should base its price on. The Percent Of Total Category field on the maintenance product should be set to Storage.
The question states that the maintenance product has already been set up with Pricing Method = Percent Of Total and the correct percentage.
Covered Products Setup
Percent Of Total Category: All products that should be included in the POT calculation must have a matching category. Therefore, on all Storage subscription products, the Percent Of Total Category field must also be set to Storage.
Include in Percent of Total: By default, Salesforce CPQ does not include subscription products in POT calculations. To explicitly include them, the Include in Percent of Total checkbox must be selected on each of the Storage subscription products.
Why other options are incorrect
B: This option incorrectly states that the maintenance product needs Include in Percent of Total set to True. That field is for covered subscription products, not the POT product itself. The POT product's pricing is determined by its Pricing Method and Percent Of Total Category.
C: This option misses a crucial step. It omits setting the Include in Percent of Total checkbox on the Storage subscription products, which is required to include subscription products in the POT calculation.
D: This option suggests setting Exclude From Percent of Total to False on the covered products. While the default setting for most products is to be included in POT, this is not true for subscriptions. Subscriptions must be explicitly included via the Include in Percent of Total checkbox. The Exclude field is generally used for one-time products that you specifically want to omit from a POT calculation.
Reference:
Implement the Percent Of Total Pricing Method - Trailhead: This Trailhead module provides a step-by-step guide to setting up percent of total pricing, including the use of categories and the distinction between subscription and non-subscription products.
Universal Containers (UC) offers several enterprise server bundles with professional
services. UC has a large catalog of professional services that are compatible with any
server. New professional services are constantly being introduced. UC wants to design the
product configuration to minimize maintenance and ensure scalability. Which two actions should the admin take to construct these new bundles?
(Choose 2 answers)
A. Create a new Custom Action that is filtered to show only Professional Services Products.
B. Create a Dynamic Feature for Professional Services Products.
C. Create a nested bundle that contains all Professional Services Products.
D. Create a Filter Product Rule with a Product Action filtering for Professional Services Products.
Explanation:
The key requirements are:
Minimize Maintenance: New services are constantly added. The solution must automatically include new products without an admin manually updating a bundle each time.
Ensure Scalability: The solution must work efficiently even as the catalog of professional services grows very large.
Compatibility: All professional services are compatible with any server.
A static bundle (Option C) would be the wrong approach as it requires constant manual maintenance every time a new service is added, which violates the core requirement.
B. Create a Dynamic Feature:
A Dynamic Feature is a special type of Product Feature that uses a query to dynamically pull in products that meet certain criteria. The admin can create a Dynamic Feature that queries for all products in the "Professional Services" category or with a specific Product Family. When a new service is added to the catalog that matches this filter, it automatically appears as an option within the bundle, requiring zero maintenance. This directly fulfills the requirement.
D. Create a Filter Product Rule:
A Filter Product Rule is used to narrow down the list of products shown to a user in the Quote Line Editor (QLE) based on certain conditions. By creating a rule that filters for Professional Services products, the admin ensures that only the relevant services are presented to the sales rep when configuring the bundle, making the process cleaner and more scalable. This works in conjunction with the Dynamic Feature.
Why A is incorrect:
A Custom Action is a button that performs a specific task in the QLE (like running a validation or adding a pre-configured group of products). It is not used for dynamically defining the contents of a bundle itself. It's an action a user takes, not a structural part of the product configuration.
Why C is incorrect:
Creating a nested bundle with all services would be a static list. Every time a new professional service is introduced, an administrator would have to manually edit this nested bundle to add the new product. This creates high maintenance and does not scale, directly contradicting UC's requirements.
Reference:
Salesforce CPQ documentation on "Dynamic Features" explains how they use a SOQL query to dynamically populate products, reducing maintenance. Documentation on "Filter Product Rules" explains how they are used to simplify the selection process for users in the QLE.
In what way does Smart Approvals expedite the approval process?
A. Approving a quote will auto-approve any lesser-discount quotes related to the same opportunity.
B. Approving a quote will auto-approve any lesser-discount quotes related to the same opportunity.
C. Quotes with multiple steps in the approval chain go directly to the highest approver required.
D. Rejected quotes that are resubmitted within previously approved values go directly to the person who rejected.
Explanation:
The Smart Approvals feature in Salesforce CPQ Advanced Approvals streamlines the approval process by leveraging historical approval data to avoid redundant approvals. When a quote is rejected and resubmitted, Smart Approvals checks whether the resubmitted values meet the conditions of previously approved steps. If the values are the same or within the previously approved range, the system skips those approval steps and routes the quote directly to the approver who rejected it, or to the next required approver. This reduces unnecessary re-approvals, saving time and improving efficiency.
Option A and B are identical and incorrect because Smart Approvals does not automatically approve lesser-discount quotes related to the same opportunity. The feature focuses on reusing prior approvals for the same quote based on unchanged or compliant conditions, not on auto-approving related quotes.
Option C is incorrect because Smart Approvals does not bypass the approval chain to go directly to the highest approver. Instead, it respects the configured approval hierarchy and only skips steps that were previously approved if conditions are met.
Option D is correct because it accurately describes how Smart Approvals optimizes the process by routing resubmitted quotes to the rejecting approver when the resubmitted values align with previously approved conditions, avoiding unnecessary re-approvals by earlier approvers.
Example Scenario:
Suppose a quote with a 25% discount requires approvals from a Sales Manager, Finance Team, and CEO. The Sales Manager and Finance Team approve, but the CEO rejects it due to the discount level. The sales rep adjusts the discount to 20% and resubmits. With Smart Approvals enabled, the system recognizes that the Sales Manager and Finance Team already approved a 25% discount (which covers the 20% discount), so the quote bypasses them and goes directly to the CEO for review.
Reference:
Salesforce Trailhead: Smart Approvals for Streamlined Resubmissions
"Smart Approvals let you streamline the approval resubmission process for your sales reps. When you enable smart approvals on an approval condition, Advanced Approvals compares the condition’s tested field value during resubmission with the tested value of the previous submission. If the values are the same, the approvers for that rule aren’t asked to approve it again during resubmission."
Salesforce CPQ Advanced Approvals Documentation
The documentation explains how Smart Approvals use the Approval Snapshot object to store previous values and determine whether re-approval is needed, ensuring efficient routing to the appropriate approver.
A user created a Quote containing two Products. The Subscription Pricing field on Product A is blank. Product B has Subscription Pricing set to Percent of Total and both Products share the same Percent of Total Category. When the Contract is renewed, both Products are shown in the renewal Quote, but Product A has a Net Total of zero. Why does Product A have a Net Total of zero?
A. Renewal Model was set to Asset Based at the Account Level.
B. Product A is an Asset that the customer already owns.
C. Include Net-New Products in Maintenance must flagged in CPQ Package settings.
D. The Asset Conversion behavior on the Product must be set to Allow Renewals.
Explanation:
Key Issue:
Product A has Subscription Pricing = blank (non-subscription product), while Product B uses Percent of Total pricing.
Both appear in the renewal Quote, but Product A’s Net Total = 0.
Why Option A is Correct?
Asset-Based Renewal Model (at the Account Level) means:
Only assets tied to subscriptions (like Product B with Percent of Total pricing) are priced in renewals.
Non-subscription products (Product A) are included but not priced (Net Total = 0) because they lack subscription terms 58.
Why Other Options Are Incorrect?
B (Product A is an owned Asset): Irrelevant—ownership doesn’t zero out pricing unless Renewal Model is Asset-Based.
C (Include Net-New Products in Maintenance): This setting controls adding new products to renewals, not pricing behavior.
D (Asset Conversion Behavior): Governs whether a product can renew, not why its price is zero 5.
Reference:
Subscription Pricing Logic: Non-subscription products (blank Subscription Pricing) are excluded from pricing calculations in Asset-Based renewals.
Renewal Models: Asset-Based renewal focuses pricing only on subscription-linked assets
Key Takeaway:
The Renewal Model setting determines which products are actively priced in renewals. Here, Asset-Based renewal explains why Product A (non-subscription) shows $0.
Universal Containers is utilizing Lookup Price Rules to pull Daily Rate values from the Rental Rates object. After activating the Price Rule, the admin notices the Daily Rate value remains blank, but the user is still able to save the quote.
Which aspect of the Price Rule should the admin review to identify the underlying issue?
A. Confirm the API Name selected in the SBQQ__LookupObject__c field on the Price Rule record Is Inputted accurately.
B. Confirm the Conditions of the Price Rule are configured accurately based on expected behavior,
C. Confirm the Tested Field(s) referenced In the Lookup Queries of the Price Rule exist on the Lookup object.
D. Confirm the Lookup Queries of the Price Rule are configured to pull only a single referenced value from the Lookup object.
Explanation:
When using Lookup Price Rules in Salesforce CPQ, the system relies on Lookup Queries to match records from the target object (in this case, Rental Rates) and return a value (e.g., Daily Rate). If the Tested Fields in the query don’t exist on the Lookup object, the rule fails silently — meaning no value is returned, but the quote still saves.
This is a common misconfiguration issue. The rule doesn't throw an error, but the field remains blank because the query can't execute properly.
🔍 Why not the others?
A. API Name in SBQQ__LookupObject__c
Important, yes — but if this were wrong, the rule would likely fail more obviously or not run at all. It’s not the most likely cause of a blank value with no error.
B. Conditions of the Price Rule
Conditions determine whether the rule runs, but if the rule is active and firing, the issue is more likely in the Lookup Query itself.
D. Lookup Queries pulling a single value
While pulling multiple matches can cause ambiguity, it typically results in an error or no match. But again, the root cause here is more likely a misconfigured field reference.
An admin is setting up multiple Option Constraints. When configuration the bundle. a user should be unable to select Product B unless the user has also selected Product A.
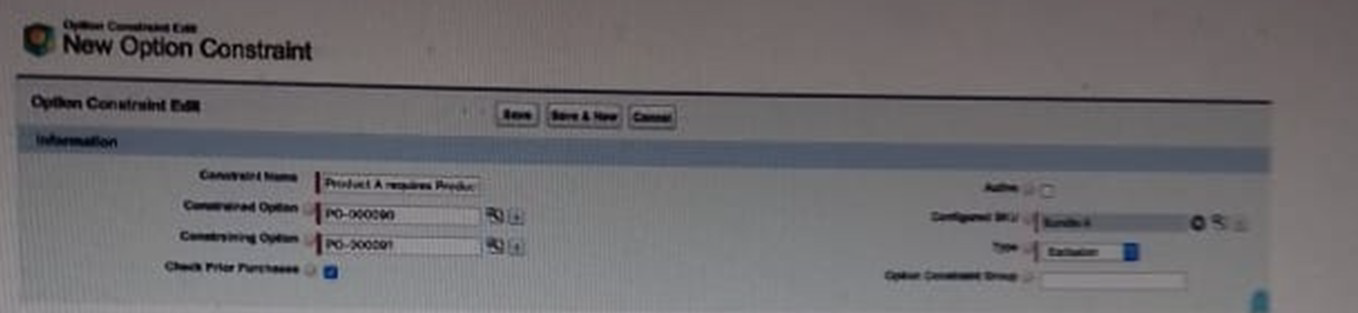
A. Option Constrain Group should be populated.
B. Option Constrain Group should be populated.
C. type should be dependency.
D. The Active checkbox should be set to True
Explanation:
To set up the Option Constraint in Salesforce CPQ where selecting Product B requires Product A to also be selected (a dependency), the Admin must take the following two steps:
C. type should be dependency
This is the core of establishing the dependency relationship. By setting the "Type" field on the Option Constraint record to 'Dependency', you ensure that the Constrained Option (Product B in this case) becomes available for selection only when the Constraining Option (Product A) has been chosen.
D. The Active checkbox should be set to True
For any Option Constraint to be enforced and actively control the product bundle configuration, it must be activated. The "Active" checkbox on the Option Constraint record enables the rule to take effect within the Salesforce CPQ environment.
Why other options are not the primary answers:
A and B. Option Constraint Group should be populated:
While Option Constraint Groups are used in Salesforce CPQ, they are specifically for scenarios where multiple constraining options collectively enable or disable a single constrained option (e.g., Product C requires both Product A and Product B). For a simple one-to-one dependency as described, populating the Option Constraint Group is not a mandatory or primary step.
A user hat created two Quotes related to an Opportunity. The user has changed the Primary Quote by checking the Primary checkbox on the non-Primary Quote. After performing this action, the amount or the Opportunity fails to update and the Quote Lines fad to sync to the Opportunity. What is the root cause of this issue?
A. The triggers have been disabled m the Installed Package Settings
B. Twin fiekJs between the Quote Une and the Opportunity Product need to be set up.
C. The Primary field on the Quote is missing from the Quote object's Calculating Fields field set.
D. Primary Quote Keeps Opportunity Products is set to FALSE in the Installed Package Settings.
Explanation:
1. Scenario Breakdown:
A user changes the Primary Quote by checking the Primary checkbox on a secondary Quote.
After this action, the Opportunity amount does not update, and Quote Lines fail to sync with the Opportunity.
2. Root Cause:
Salesforce CPQ relies on triggers to automatically sync Quote data (e.g., amounts, line items) to the Opportunity when the Primary Quote is changed.
If these triggers are disabled in the Installed Package Settings, the sync process breaks, leading to the described issue.
3. Why Option A is Correct?
Disabled triggers prevent the system from:
1. Updating the Opportunity amount.
2. Syncing Quote Lines to Opportunity Products.
This aligns with Salesforce CPQ’s dependency on backend automation for Primary Quote changes.
4. Why Other Options Are Incorrect?
B. Twin fields are unrelated to Primary Quote sync issues (they govern field mappings between Quote Lines and Opportunity Products).
C. The Calculating Fields field set controls which fields trigger calculations, not Primary Quote synchronization.
D. "Primary Quote Keeps Opportunity Products" determines whether old Quote Lines are retained when a new Primary Quote is set. This does not affect Opportunity amount updates or sync failures.
A Universal Containers User states that a Configuration Attribute value can be set up during the initial configuration, but the value is not present when they reconfigure. What should the Admin check to ensure the Configuration Attribute value is properly saved?
A. A twin field must be created on the Quote object.
B. A twin field must be created on the Product Option object.
C. A twin field must be created on the Product object.
D. A twin filed must be created on the Quote Line object.
Explanation:
Configuration Attributes allow users to set values during bundle configuration (for example, "Color" or "Service Level").
For the value to persist after the initial configuration (so it shows up again when reconfiguring), Salesforce CPQ requires a twin field.
How Twin Fields Work:
A twin field is a field with the same API name, data type, and field type, existing on both:
The Configuration Attribute’s Target Object (e.g., Product Option, Quote Line, etc.)
The Quote Line object (where the value is stored during quoting).
Since Configuration Attribute values must flow onto the Quote Line, the twin field must exist there. Otherwise, the system has nowhere to save and retrieve the value when reconfiguring.
❌ Incorrect Options
A. Quote object – Wrong. Config attribute values are stored at the Quote Line level, not Quote header level.
B. Product Option object – Wrong. While config attributes can point to a Product Option field, persistence requires a twin on the Quote Line.
C. Product object – Wrong. The Product record is static; config attributes are per-quote, so the Product object isn’t where values persist.
📖 Reference
Salesforce CPQ Developer Guide: Configuration Attributes and Twin Fields
Key rule:
“To persist Configuration Attribute values, ensure a twin field exists on the Quote Line.”
While performing an amendment, a sales rep is unable to edit the Additional Discount for an existing subscription Quote Line. What is the cause of this behavior?
A. A Product Rule is preventing the Additional Discount from being edited.
B. The Non Discountable field is marked True on the Product record for the Quote Line.
C. Additional Discount is a locked field on amendment Quotes.
D. The org is using legacy amendment and renewal service.
Explanation:
In Salesforce CPQ, amendment quotes behave differently from new business quotes.
When you amend a subscription:
1. CPQ locks certain fields on existing subscription Quote Lines to preserve the integrity of the original contract.
2. One of those locked fields is Additional Discount on the Quote Line.
Why?
1. CPQ assumes that the original subscription pricing terms are binding.
2. You can change quantities, subscription terms, or add new products during amendments.
3. But discounts applied to the original subscription typically cannot change during an amendment because that would retroactively modify the original contracted price.
So if a sales rep tries to edit Additional Discount on an amendment quote, they’ll find it grayed out (read-only). This is entirely expected behavior.
Why Not The Other Options?
A. A Product Rule is preventing the Additional Discount from being edited.
🚫 Wrong: While Product Rules can lock fields, the default reason Additional Discount is locked during amendments is CPQ system behavior, not a rule.
B. The Non Discountable field is marked True on the Product record for the Quote Line.
🚫 Wrong: That prevents discounts on all quotes, not just amendments. But this scenario is specific to an amendment.
D. The org is using legacy amendment and renewal service.
🚫 Wrong: The legacy vs. new amendment service doesn’t cause Additional Discount to be locked. This is a standard restriction either way.
Northern Trail Outfitters has two different user profiles that need to see different Quote Line fields in the Quote Line Editor. How should the admin configure CPQ so users automatically see the desired fields in the Quote Line Editor?
A. Create two field sets on the Quote object representing each profile, and create a text formula field with the API name HeaderFieldSetName on the Quote object that returns the appropriate field set name based on the user's profile
B. Create two field sets on the Quote object representing each profile, and create a text formula field name EditLinesFietdSetName on the Quote object that returns the appropriate field set the user's profile.
C. Create two field sets on the Quote Line object representing each profile, and create a test formula field sets with the API named EditLinesFieldSetname on the Quote object that returns the appropriate field set name based on the user’s profile.
D. Create two field sets on the Quote Line object representing each profile, and create a test formula field sets with the API named EditLinesFieldSetname on the Quote object that returns the appropriate field set name based on the user’s profile.
Explanation:
To dynamically control which Quote Line fields are displayed in the Quote Line Editor (QLE) for different profiles, the admin must:
1. Create Field Sets on the Quote Line Object (Not the Quote object)
Field sets define which fields appear in the QLE.
Since the requirement is about Quote Line fields, the field sets must be on the Quote Line object (SBQQ__QuoteLine__c).
2. Create a Formula Field on the Quote Object
A text formula field named EditLinesFieldSetName (exact API name required) determines which field set loads.
The formula should return the field set name based on the user’s profile (e.g., using $Profile.Name).
Why Option C is Correct?
Field sets are on the Quote Line object, matching the requirement to control QLE fields.
The formula field EditLinesFieldSetName dynamically selects the correct field set.
Why Other Options Are Incorrect?
A & B: Incorrect because they suggest field sets on the Quote object (controls header fields, not Quote Line fields).
D: Duplicate of C but contains a typo ("test formula field sets" instead of "text formula field").
| Page 1 out of 22 Pages |
| 1234567 |
Our new timed 2026 Salesforce-CPQ-Administrator practice test mirrors the exact format, number of questions, and time limit of the official exam.
The #1 challenge isn't just knowing the material; it's managing the clock. Our new simulation builds your speed and stamina.
You've studied the concepts. You've learned the material. But are you truly prepared for the pressure of the real Salesforce Certified CPQ Administrator exam?
We've launched a brand-new, timed Salesforce-CPQ-Administrator practice exam that perfectly mirrors the official exam:
✅ Same Number of Questions
✅ Same Time Limit
✅ Same Exam Feel
✅ Unique Exam Every Time
This isn't just another Salesforce-CPQ-Administrator practice questions bank. It's your ultimate preparation engine.
Enroll now and gain the unbeatable advantage of:
| Group | Pass Rate | Key Advantages |
|---|---|---|
|
Used Practice Tests
|
90-95% |
• Familiarity with exam format • Identified knowledge gaps • Time management practice |
|
No Practice Tests
|
50-60% |
• Relies solely on theoretical study • Unprepared for question styles • Higher anxiety |
Copyright © - All Rights Reserved